Create a delivery
In this section we describe how to create a delivery. A delivery is required to interact with the facts stored in the i-refactory.
Deliveries always point to one certain Layer. The following type of deliveries are supported:
- Delivery to the Logical Validation Layer (LVL), defining incoming batch deliveries from data-suppliers
- Delivery to the Generic Data Access Layer (GDAL), defining Create-Read-Update-Delete (CRUD) interaction
- Delivery from the File Export Layer (FILE_EXPORT), defining outgoing batch deliveries to data-consumers
There are two ways to create a delivery. In most cases the delivery is created with an API. For developmental purposes, it is also possible to create and process a delivery manually:
- Click here to jump to the API section.
- Click here (mostly for development purposes) to read more about manually creating a delivery.
Before you Begin
- Make sure a tenant is created.
- Make sure a delivery agreement is created for the relevant Layer.
- In case of deliveries to the Logical Validation Layer you should be familiair with the delivery load strategy and understand the delivery process and it is assumed the data is already loaded into the corresponding tables in the Technical Staging Layer (TSL).
How to create a delivery
Deliveries trigger the activities to process incoming or outgoing data-exchange. In this section we explain how to configure each type of delivery.
-
Click on the
Menu > Supply > Delivery. -
Select the Layer for which you want to create a Delivery and then press
New.
Create new delivery -
In the form that appears you are required to assign a
Delivery Agreement. The delivery will inherit the relevant metadata of the Delivery Agreement, Layer, Interface and Entities. -
Optionally you can enter you own reference number in
Message Numberor other reference details inMessage Text. Dependent on the Layer for which you create Delivery, you can fill in further details. Next paragraphs explain how to configure each type of delivery in the form that appears. -
Don't forget to save the delivery once you completed the configuration settings for the delivery.

Saved delivery
Configure settings for delivery to the Logical Validation Layer
Track and Trace
-
Choose the
Received Date. Submit the date on which the delivery was actually received.{warning} The
Received Dateyou enter must always be later than theReceived Dateof previous deliveries. -
Optionally choose a
Sent Date. Submit the date on which delivery was actually sent.
Configure the Validation process
-
Choose what level of
Constraint Validationneeds to be executed. If you want to cancel the selection, click onNo selection.None: executes minimum technical prerequisite. The checks are fully based on database processing and are not part of the validation process. If you select this option and there are data errors, this may result in a database error or an other technical error that breaks the processing of the delivery.All: all constraints are checked during the validation proces.Default: all delivery agreements constraints in thedefaultgroup are checked during the validation process.-
Mandatory: constraints that are inherent (mandatory) to the structure of a data model are checked during the validation process. The mandatory constraints to check are:- attribute datatype
- attribute mandatory
- primary key
-
alternate key
{tip} A good practice is to chose the validation level
Mandatoryas a minimum option, since this controls minimum set of validations when loading data into the Central Facts Layer in a controlled manner.
-
Violated Constraint Max Sample Size: maximum sample size of violated constraints that are logged. By default, this is 1000. A lower sample size can improve the throughput of the validation process and lowers the storage cost in case of a high volume of constraint violations. Sample size value is per constraint. So for each constraint a maximum of sample size records will be registered, including the record on which the constraint violated. -
For delivery's on the Logical Validation Layer you can override the inherited includeExistingDataForSkippedRowsInSetValidation value from Delivery Agreement. includeExistingDataForSkippedRowsInSetValidationConclusion shows the computed value for this Delivery.
This setting prompts the user to decide whether to include rows that there rejected for basic constraints in previous deliveries by default the i-refactory tries to fetch the known data of these rejected rows from previous deliveries. This data is then used to perform set validations on rows in the current delivery that did not get rejected. The table below shows howincludeExistingDataForSkippedRowsInSetValidationConclusionis computed for a Delivery.Delivery value Delivery Agreement value Delivery Conclusion DEFAULT YES YES DEFAULT NO NO YES NO YES NO YES NO -
Context Related Entities Contain New Rows(for context-based deliveries): select this option if you are sure the context-related entities contain only new records. If this option is selected, i-refactory handles the delivery as a full delivery for every entity the context filter is set to True.{info} Selecting
Context Related Entities Contain New Rowsresults in a quicker writing proces, because no difference is computed between a full and delta delivery set. The delivery won't delete any data, only save and update.
Configuration to process deletes
The i-Refactory has built in logic to identify deleted records (records that do no longer exist).
For entities that are provided as full, all records that already exist but are no longer available are considered 'relevant for deletion'. For entities delivered as delta, the deletion indicator provided in the record will indicate 'relevant for deletion'.
The delete type indicator affects how deletions are handled.
- Set how
Deletesin the dataset will be treated. Click here for more information about removing records and the differences between logical deletes and physical deletes.Logical: the deleted records will be end-dated and flagged as deleted in the CFL. The logical deleted records are shown in the 'hist' views in the GDAL but not shown in the 'current view'. By default, this option is selected. More information can be found here.Physical: the context information of the deleted records is physically removed from the Logical Validation Layer. In the Central Fact Layer, the Context data of the records will be physically deleted and the relevant key in the Anchor will be marked as physically removed. More information can be found here.
Delivered entities
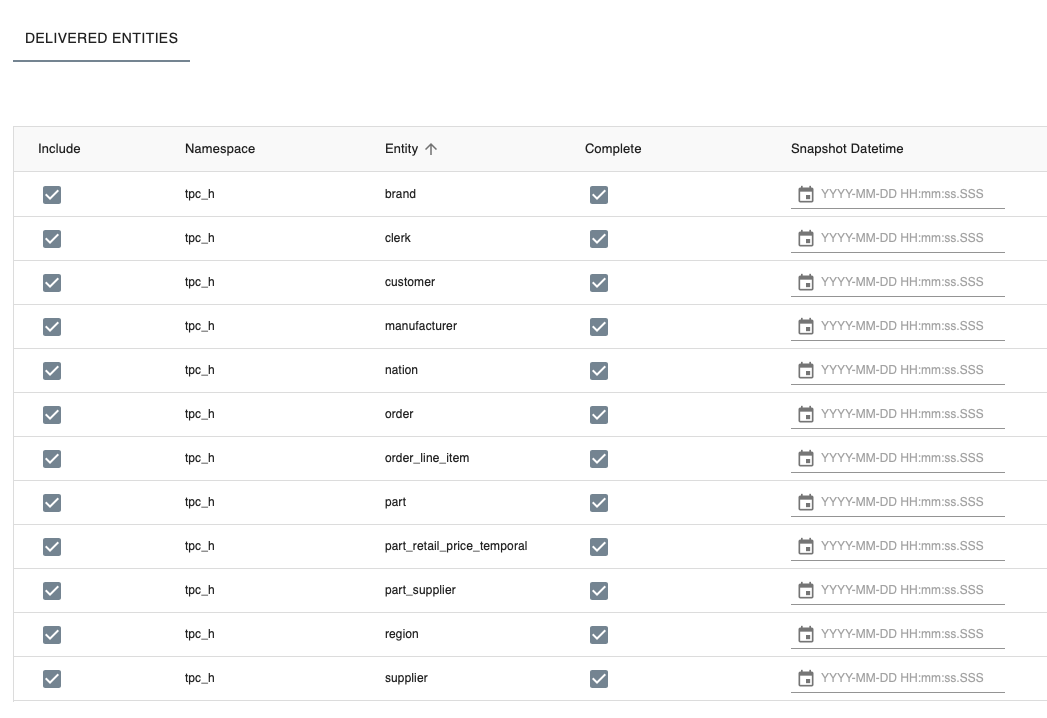
In the 'Delivered entities' section, you can select which entities will be delivered and submit their snapshot date.
The following delivery loading strategies are available:
- If you choose to include all entities, you opt for a
CompleteDelivery. - If you choose to exclude some entities, you opt for a
PartialDelivery. - If you choose to mark an entity as complete you opt for a
FullDelivery of the related Entity. - If you choose to mark an entity as not complete, you opt for a
DeltaDelivery of the related Entity. - If you opt for a
Context Based Delivery, you need to classify a foreign key relation between entities in your data model as use as context filter and select the driving entity asDeltaand the dependent entity asFull.
To customize the options:
- By default, all
Entitiesare included in the delivery. You can unselect the checkbox to exclude entities, for example, for partial deliveries. - By default, all
Entitiesare marked asComplete. Unselect the checkbox to mark the entity as a delta delivery. -
Optionally set a
Snapshot datetimeper entity. TheSnapshot datetimewill be used as transaction datetime when registering facts in the Central Facts Layer. If you do not enter a specific Snapshot datetime, the transaction time will set to the system datetime of the i-refactory server.{info} When to use Snapshot Datetime:
If you want strict control over the transaction timelines that manage the validity window of the provided records, you have the option to override the default behaviour of using the server datetime as the timestamp that opens new records and enddate deleted or updated records.
Use cases to do this is to align the target system managed by i-Refactory with the data validity timelines of the source system or even the source system entity. Another use could be to load historical datawarehouse data into the system managed by i-refactory and keep the already existing timelines available.
In all cases the snapshot datetime for a delivered entity must be after the last provided snapshot datetime.
ExampleSuppose there is already a delivery at Time 1 and a delivery at Time 3.You want to add a delivery at transaction Time 2. You cannot submit Time 2 as
Received DatebecauseReceived Dateneeds to be later than Time 3 (this delivery is already in the database). However, you can enter Time 2 asSnapshot Datetimeand thetransaction datetimein the database will correspond to Time 2.
Configure settings for delivery for the Generic Data Access Layer (CRUD)
- Set
Physical Deletes allowedwhen you want to allow delete actions result in physical removal as part of the CRUD transaction.
After saving this delivery, the i-refactory engine will directly activate the required processes after which it will be possible to insert, update, and delete the facts for the entities in the given Generic Data Access model. The Generic Data Access delivery will be active until stopped.
{info} If a delivery to the Logical Validation Layer (LVL) for the same Central Facts Layer is running, the GDAL Delivery will be blocked and only released when the LVL delivery has reached an end-state.
Configure settings for delivery from the File Export Layer (FILE_EXPORT)
-
Enter the details of the request into Export Specification as a JSON. Use Display Schema to learn about all the options you have.
This example shows you an example a JSON based Export Specification:
{
    "snapshotDatetime": "2023-09-26 10:43:14.0430000",
    "localFileSystem": {
        "rootPath": "/Users/tester/tmp/"
    },
    "filterParameters": [
        {
            "columnCode": "dataProducerName",
            "columnValue": "RAB"
        },
        {
            "columnCode": "deliveryId",
            "columnValue": "1000"
        }
    ],
    "customMetadata": {
        "obligation": 1096531987,
        "modelCode": "TPCH",
        "modelVersion": "1.0.4",
    }
}
At least you provide:
- snapshotDateTime
- rootPath of the LocalFileSystem or of the adslFileSystem
- in case of the adslFileSystem you also need to provide the accountName and containerName Optionally you can add:
- filterParameters as an array of columnCode and columnValue combinations
- customMetadata where you are free to enter all kind of reference data as a JSON
{info} filterParameters are case sensitive. By providing only columnCodes (and not the combination of entityCode/columnCode) the system automatically uses matching columns from all entities within the File Export interface as a filter.
As part of the export, the rootPath is extended with the following path: /export-<export delivery id>/schema code>/<entity code>/. The exported files are named <entity code>.parquet. By default all files are exported as parquet ( more information can be found here ).
For each delivery, a manifest file will be placed in /export-<export delivery id>/ and is named exportDelivery.json. The manifest file includes the following:
-
deliveryId of the export
-
receivedate of the export-delivery API call
-
the used FILE EXPORT interface
-
the Export Specification as defined in the delivery request
-
a list of details for each entity exported:
namespace_id namespace_code entity_id entity_code rowcount_method rowcount message_nbr message_text 47 tpch 19 order Approximate 2000 47 tpch 22 order_lines Approximate 8005 -
Messages are used to communicate warnings when attribute values are restricted in length. For example, when undefined varchar(max) datatypes are used.
Manual processing of a delivery to the Logical Validation Layer
For testing purposes you can process a delivery by manually switching the state transitions. This simulates API processing of external deliveries.
- Click on
menu > Supply > Delivery. - Select the delivery you want to manually process. If there is no delivery available, you need to create Create delivery.
- Expand the details of a saved Delivery by clicking on the 'arrow down' icon.

Saved delivery - Select the tab
Technical Staging Entity Updates.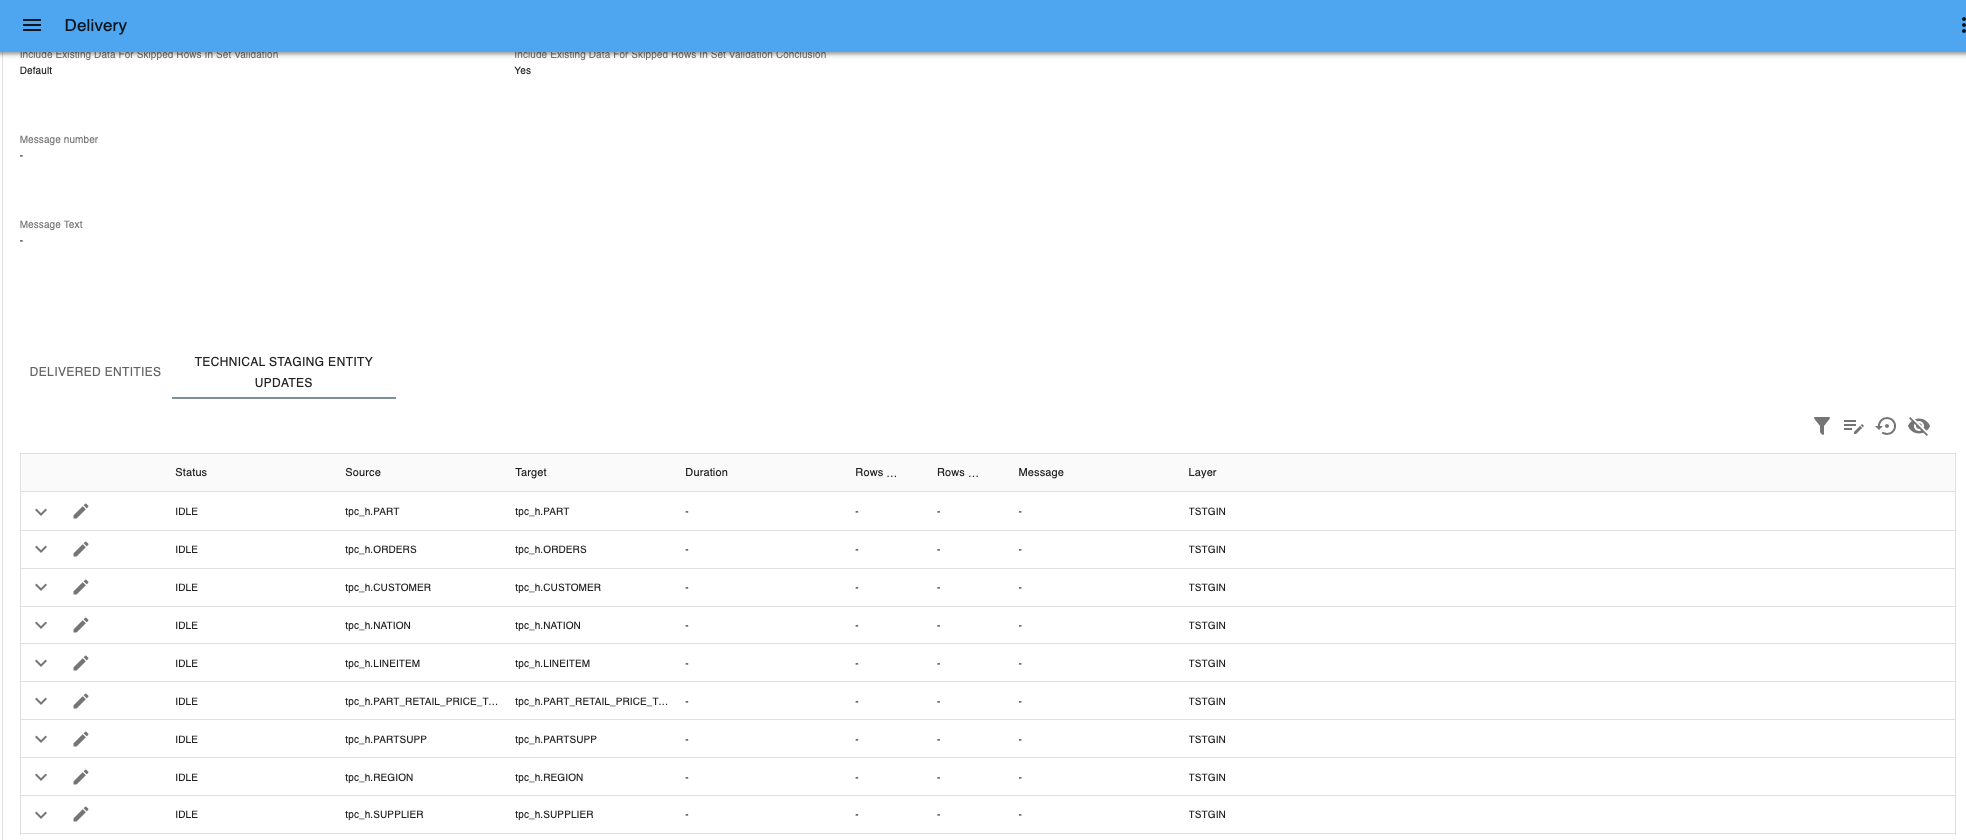
Technical Staging Entity Updates - Select Toggle Batch Edit.
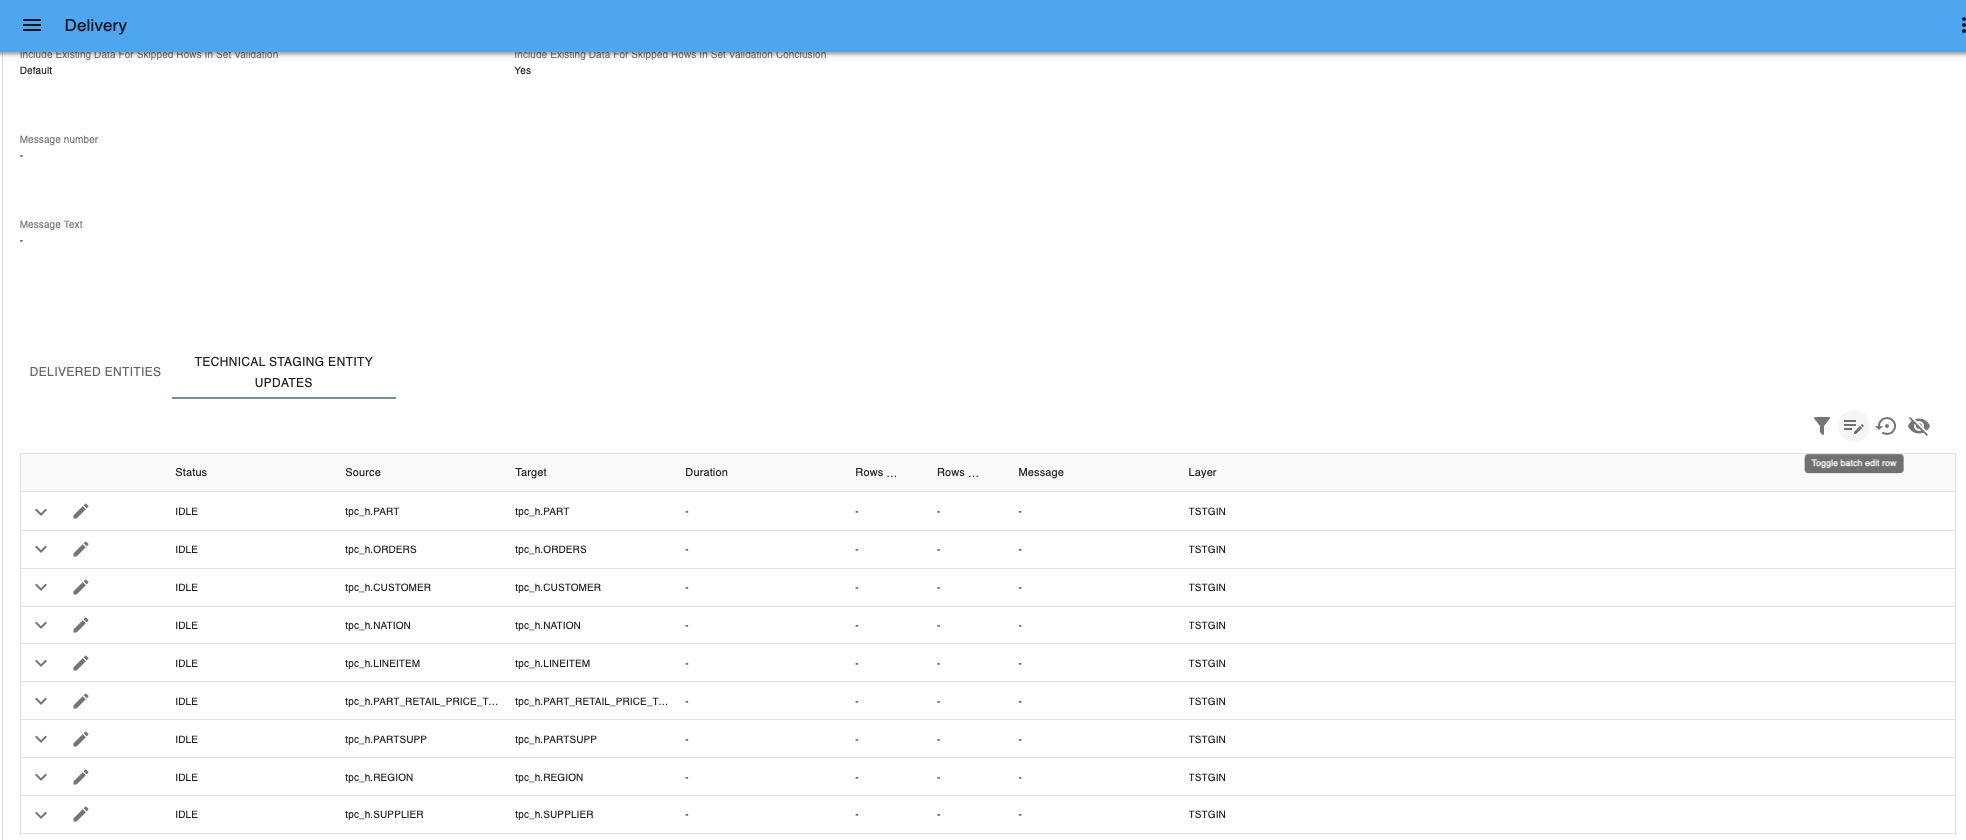
Toggle Batch Edit - Select all Entities by marking the checkbox in the top layer.
- Select a status. You can choose between:
- IDLE: default status. i-refactory engine is idle.
- PROCESSING: simulates loading data in the Technical Staging In Layer (TSL).
- SUCCEEDED: simulates loading data successfully in the Technical Staging In Layer (TSL). You need to set the status to
PROCESSINGfirst, before you can switch toSUCCEEDED. - FAILED: simulates failure in loading data in the Technical Staging In Layer (TSL). You need to set the status to
PROCESSINGfirst, before you can switch toFAILED.
- Select the status
PROCESSINGand press Apply to all selected rows.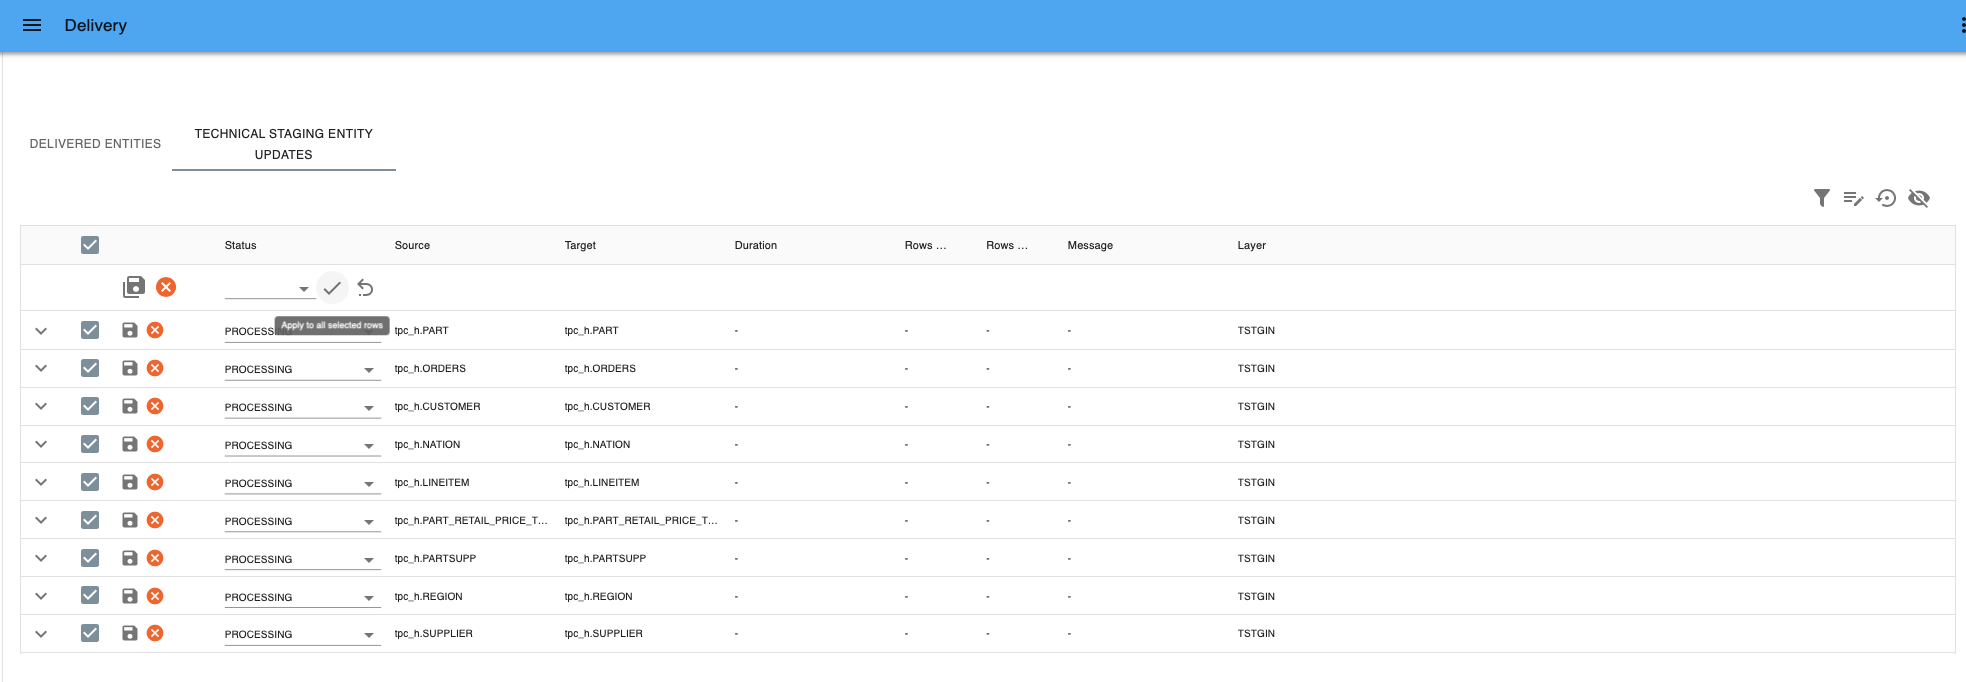
Apply to all selected rows - Press Save all details to save the changes or Cancel all edits if you want to revert.
- To simulate a succeeded delivery:
- Select the status
SUCCEEDEDand press Apply to all selected rows. - Press Save all details to save the changes or Cancel all edits if you want to revert.
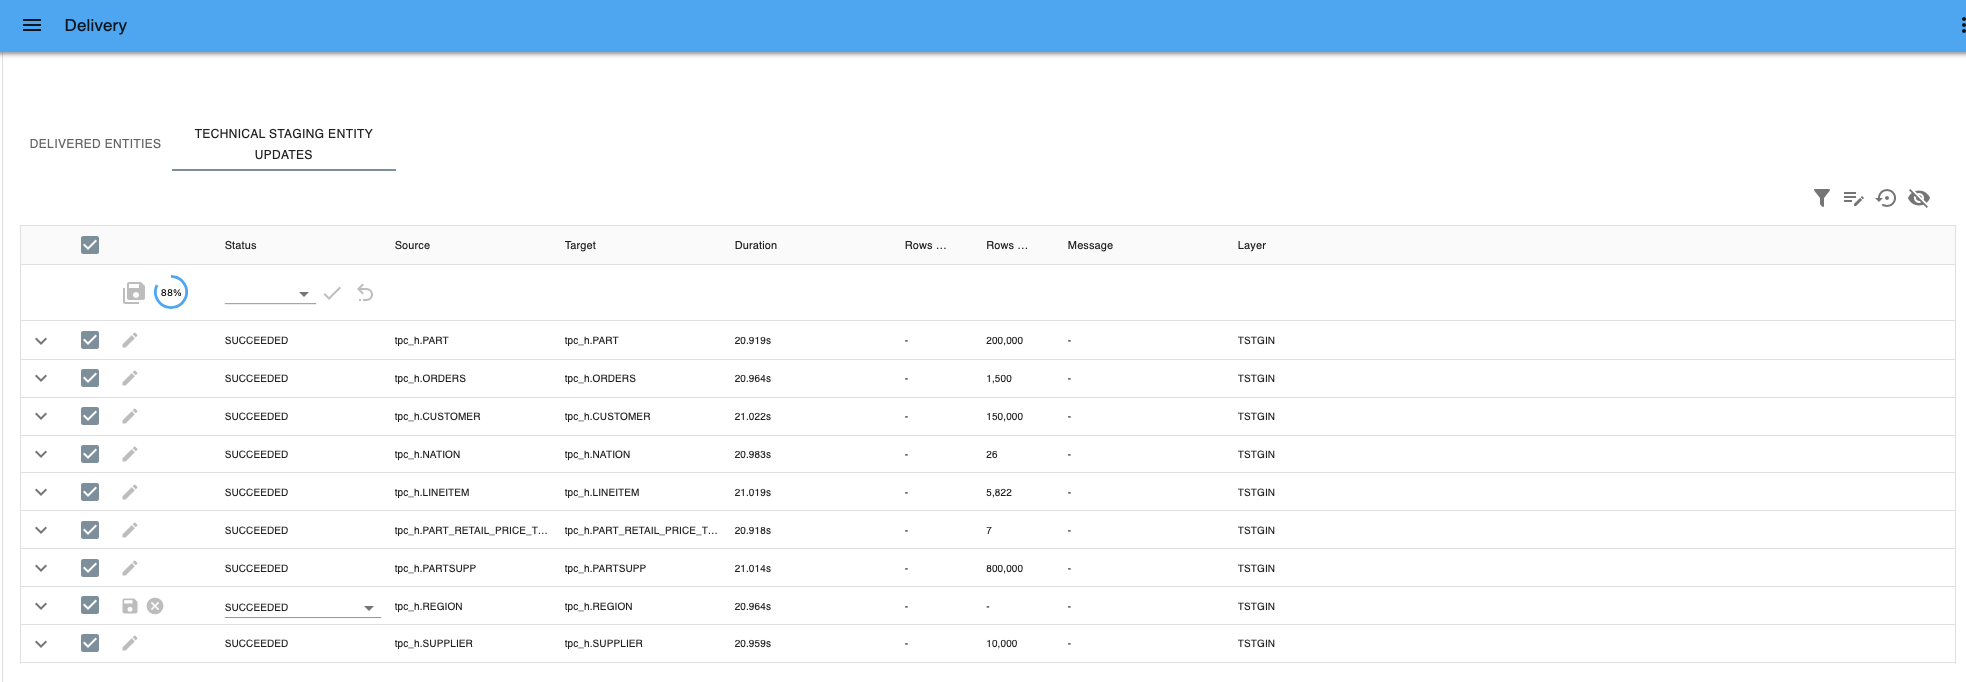
Save all details - If you go to
menu > Supply > Monitor, you can see the delivery process in the monitor. - If you go to
menu > Supply > Delivery Statistics, you can analyze the delivery statistics.
- Select the status
- To simulate a failed delivery:
- Select the status
FAILEDand press Apply to all selected rows. - Press Save all details to save the changes or Cancel all edits if you want to revert.
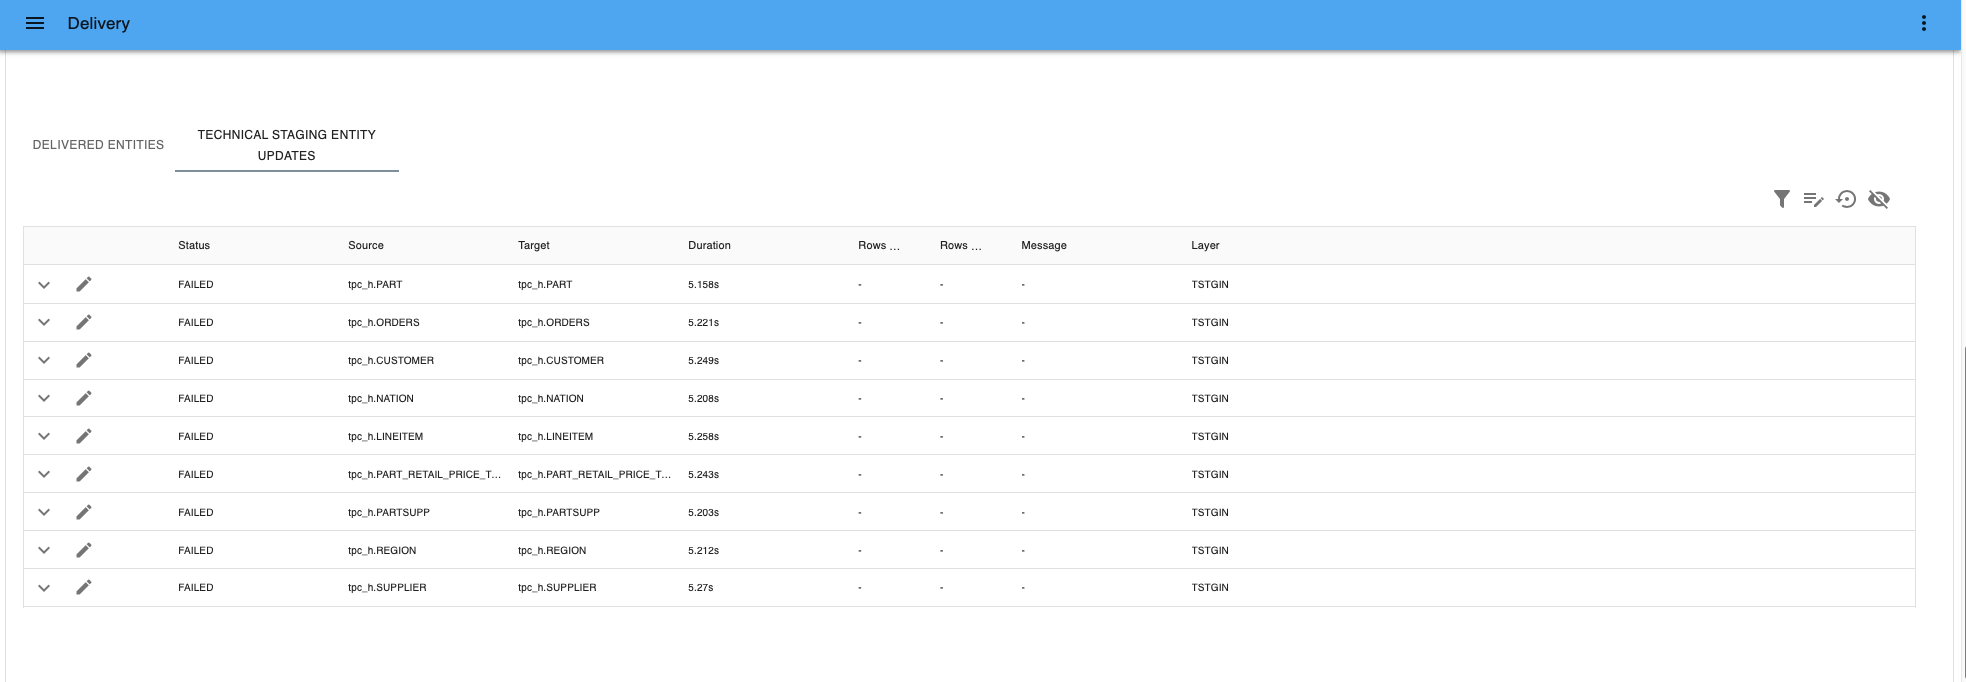
Failed delivery - If you go to
menu > Supply > Monitor, you can see the failed delivery in the monitor.
Failed delivery - If you want to solve the failed delivery, you can go choose between three options in the Monitor.
- Retry: you can retry processing the delivery. If the status is FAILED in the TSL, you can start processing again (Go to Step 8).
- Reject: the end-state is met directly and the delivery is no longer shown as a active delivery.
- Cancel: all idle and scheduled processes will be cancelled. Processes in the processing stage will be continued and finished.
- Select the status
{warning} Cancelling Deliveries could lead to an unwanted intermediate state of your data if the cancel happens after the Technical Staging Layer (TSL). A cancel is not a rollback to a previous state. If you cancel the current Delivery, the processed and successful entity updates in these delivery are stored in the Central Facts Layer, while the idle and scheduled tasks are stopped.
{info} i-refactory assumes that you have (manually) filled the associated tables in the TSL, as this is not part of the i-refactory application.
Use of APIs to manage deliveries
You can find the API documentation on: <hostname>:3001. For example: https://localhost:3001/
Example json-configuration for creating a delivery to the Logical Validation Layer where only orders and orderlines are expected to be processed using the CSV-loader option:
{
    "architectureLayerCode": "HSTGIN",
    "interfaceCode": "TPC_H_HSTGIN",
    "tenantCode": "TPCH",
    "receivedDt": "2022-01-02T00:00:01",
    "sentDt": "2022-01-01T12:00:00",
    "snapshotDt": "2022-01-01T00:00:00",
    "isComplete": true,
    "constraintsToValidate": "ALL",
    "violatedConstraintMaxSampleSize": 50,
    "logicalValidationDeliveryDeleteType": "LOGICAL",
    "deliveredEntity": [
        {
            "namespaceCode": "tpc_h",
            "entityCode": "order",
            "isComplete": false
        },
        {
            "namespaceCode": "tpc_h",
            "entityCode": "order_line_item",
            "isComplete": true
        }
    ],
    "csvLoaderSpecification": {
        "uncPath": "//Mac/home/i-refact-demo-tpch/deliveredData/orderSystem/delivery-report-load",
        "codePage": "raw",
        "fieldTerminator": "|",
        "firstRowIsHeader": false,
        "fileExtension": "tbl"
    }
}
A delivery from the File Export Layer can be called using this example.
{
    "architectureLayerCode": "FILE_EXPORT",
    "interfaceCode": "TPC-H GDAL",
    "tenantCode": "TPCH",
    "exportSpecification":
    {
        "snapshotDatetime": "2023-09-26 10:43:14.0430000",
        "localFileSystem": {
        "rootPath": "/Users/tester/tmp/"
        },
        "filterParameters": [
            {
                "columnCode": "dataProducerName",
                "columnValue": "RABO"
            },
            {
                "columnCode": "deliveryId",
                "columnValue": "1000"
            }
        ],
        "customMetadata": {
            "obligation": 1096531987,
            "modelCode": "TPCH",
            "modelVersion": "1.0.4"
        }
    }
}Transaction timeline
Similar to the valid timeline, a transaction timeline consists of a start date and end date.
It is the period during which a fact is valid in the system.
- Transaction start date: the time at which a fact is known in the (source) system.
- Transaction end date: the time at which a fact is logically changed or not known anymore in the system.
In the i-refactory the transaction time is tracked with acm_start_dt and acm_end_date.
The transaction time in i-refactory is different from what is commonly understood by transaction time. Transaction time is usually seen as the moment when a fact was stored in the database. In i-refactory the transaction time is as dictated by the source system, not by the i-refactory database.
The delivery tenant can specify with the snap_shot_date what the transaction start date (acm_start_dt) has to be.
{warning} The transaction start date of a new delivery has to be later than the transaction start dates of earlier deliveries.

